Modify an existing page with a Chrome extension built using Angular and Yeoman Part 1
Page altering
We have all seen Chrome extensions like Yesware that modify an existing web page. In the case of Yesware it add features to Gmail like tracking and email templates. This tutorial covers how to make an extension, like Yesware, that alters an existing web page. At the end of this two part series we would have made an extension that adds a 'Search on Bing' button to the Google home page. To aid this endeavor, Angular and Yeoman are going to be leveraged.


- Make sure you have latest Node, NPM, and Yeoman installed.
- Install the Yeoman generator,
generator-chrome-extension - Have Yeoman create scaffolding for a Chrome extension
- Install Binged icon.
- Install Angular
- Edit the
app/manifest.jsonto match the below code. You may also delete the background scripts section as they will not be needed. - Load the extension.
- Bootstrap Angular within
app/scripts/contentscript.js - Add a basic controller. Go the Google search page and open Chrome web inspector in order to find a good element to stick a ng-controller.
- Go back to
app/scripts/contentscript.jsand wire up a dummy controller. - Next, let's add a very basic directive.
- Go back to
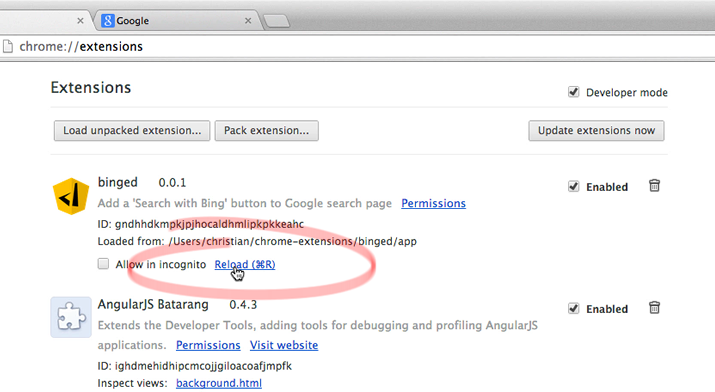
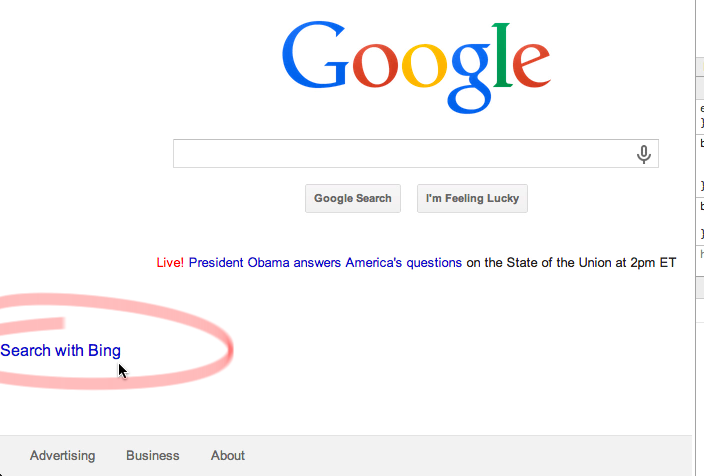
chrome://extensionsand reload. - Go to the Google search page and reload.
$ mkdir ~/chrome-extensions/binged && $_
$ npm install -g generator-chrome-extension
$ yo chrome-extension
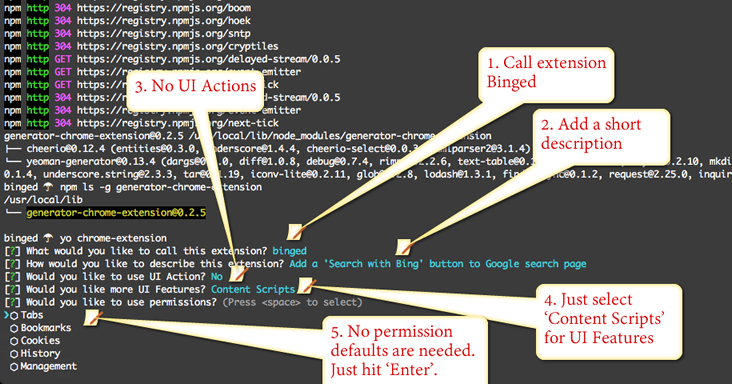
yo chrome-extension fill out the wizard like so.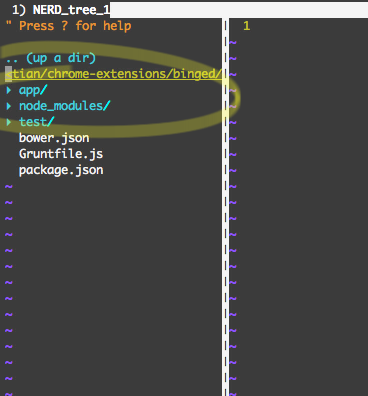
npm && bower install will kickoff. Your directory structure after a successful install should be like this.curl https://d38ux1iykvusrb.cloudfront.net/articles/111/icon-128.png > app/images/icon-128.png
bower install angular --save
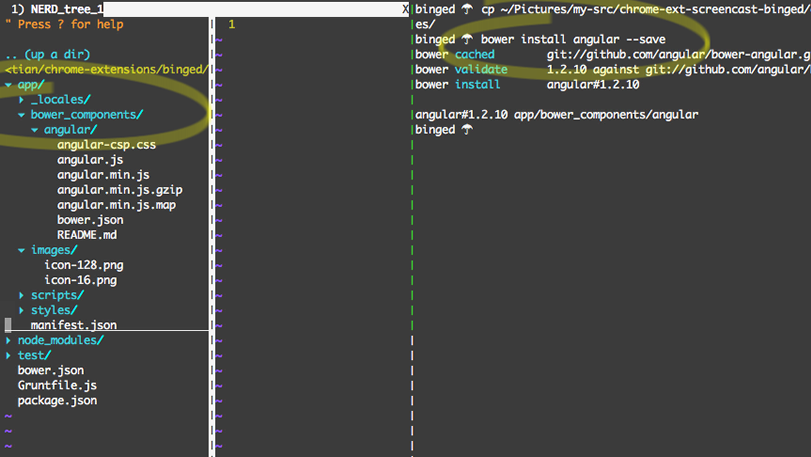
app->bower_components->angular
{
    "name": "__MSG_appName__",
    "version": "0.0.1",
    "manifest_version": 2,
    "description": "__MSG_appDescription__",
    "icons": {
        "16": "images/icon-16.png",
        "128": "images/icon-128.png"
    },
    "default_locale": "en",
  "content_scripts": [
    {
      "matches": [
        "http://*/*",
        "https://*/*"
      ],
      "css": [
        "bower_components/angular/angular-csp.css",
        "styles/main.css"
      ],
      "js": [
        "bower_components/angular/angular.min.js",
        "scripts/contentscript.js"
      ],
      "run_at": "document_end",
      "all_frames": false
    }
  ],
  "content_security_policy": "script-src 'self'; object-src 'self'",
"web_accessible_resources": [
  "bower_components/angular/*"
]
}
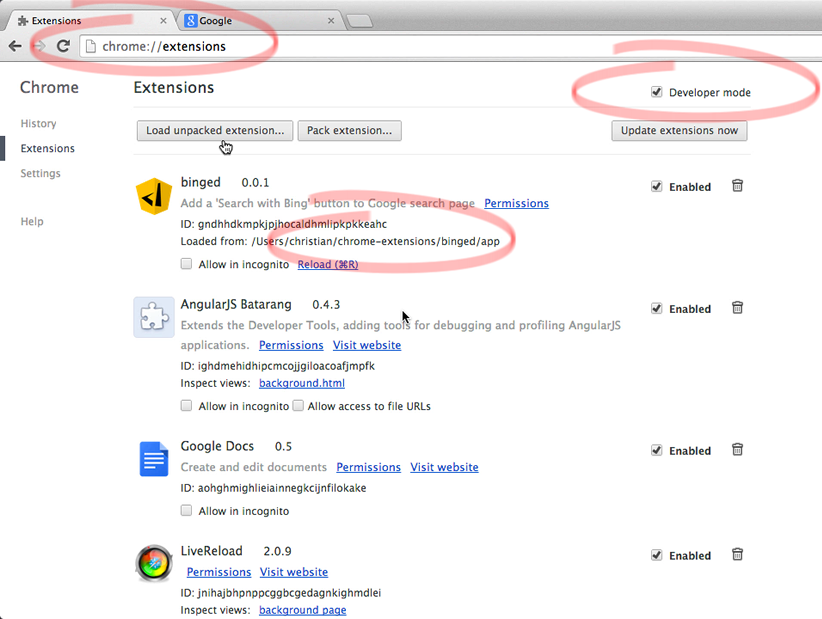
~/chrome-extensions/binged/app directory.
'use strict';

window.addEventListener("load", function() {
  var app = angular.module('Binged', []);

  var html = document.querySelector('html');
  html.setAttribute('ng-app', '');
  html.setAttribute('ng-csp', '');

  angular.bootstrap(html, ['Binged'], []);
});
ng-csp attribute or the extension will not work.
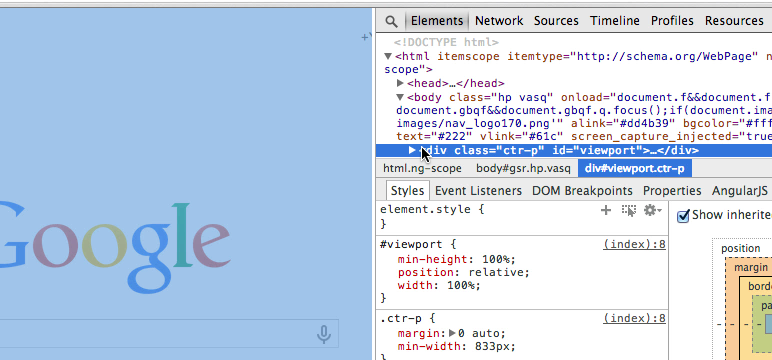
viewport id looks like a good place for an Angular controller.
window.addEventListener("load", function() {
  var app = angular.module('Binged', []);

  var html = document.querySelector('html');
  html.setAttribute('ng-app', '');
  html.setAttribute('ng-csp', '');

  var viewport = document.getElementById('viewport');
  viewport.setAttribute('ng-controller', 'MainController');
  app.controller('MainController', function ($scope) {});

  angular.bootstrap(html, ['Binged'], []);
});
window.addEventListener("load", function() {
  var app = angular.module('Binged', []);

  var html = document.querySelector('html');
  html.setAttribute('ng-app', '');
  html.setAttribute('ng-csp', '');

  var viewport = document.getElementById('viewport');
  viewport.setAttribute('ng-controller', 'MainController');
  app.controller('MainController', function ($scope) {});

  var myDirective = document.createElement('div');
  myDirective.setAttribute('my-directive', '');
  viewport.appendChild(myDirective);

  app.directive('myDirective', function() {
    return {
      restrict: 'EA',
      replace: true,
      template: 'Search with Bing'
    };
  });

  angular.bootstrap(html, ['Binged'], []);
});
End of Part 1
That is a good place to take a breather. In part 2, I will finish the extension to match the screenshot in the beginning of the article. Again, if you want more detail and explanation make sure to view the screencast.
- Pushed on 02/17/2014 by Christian
